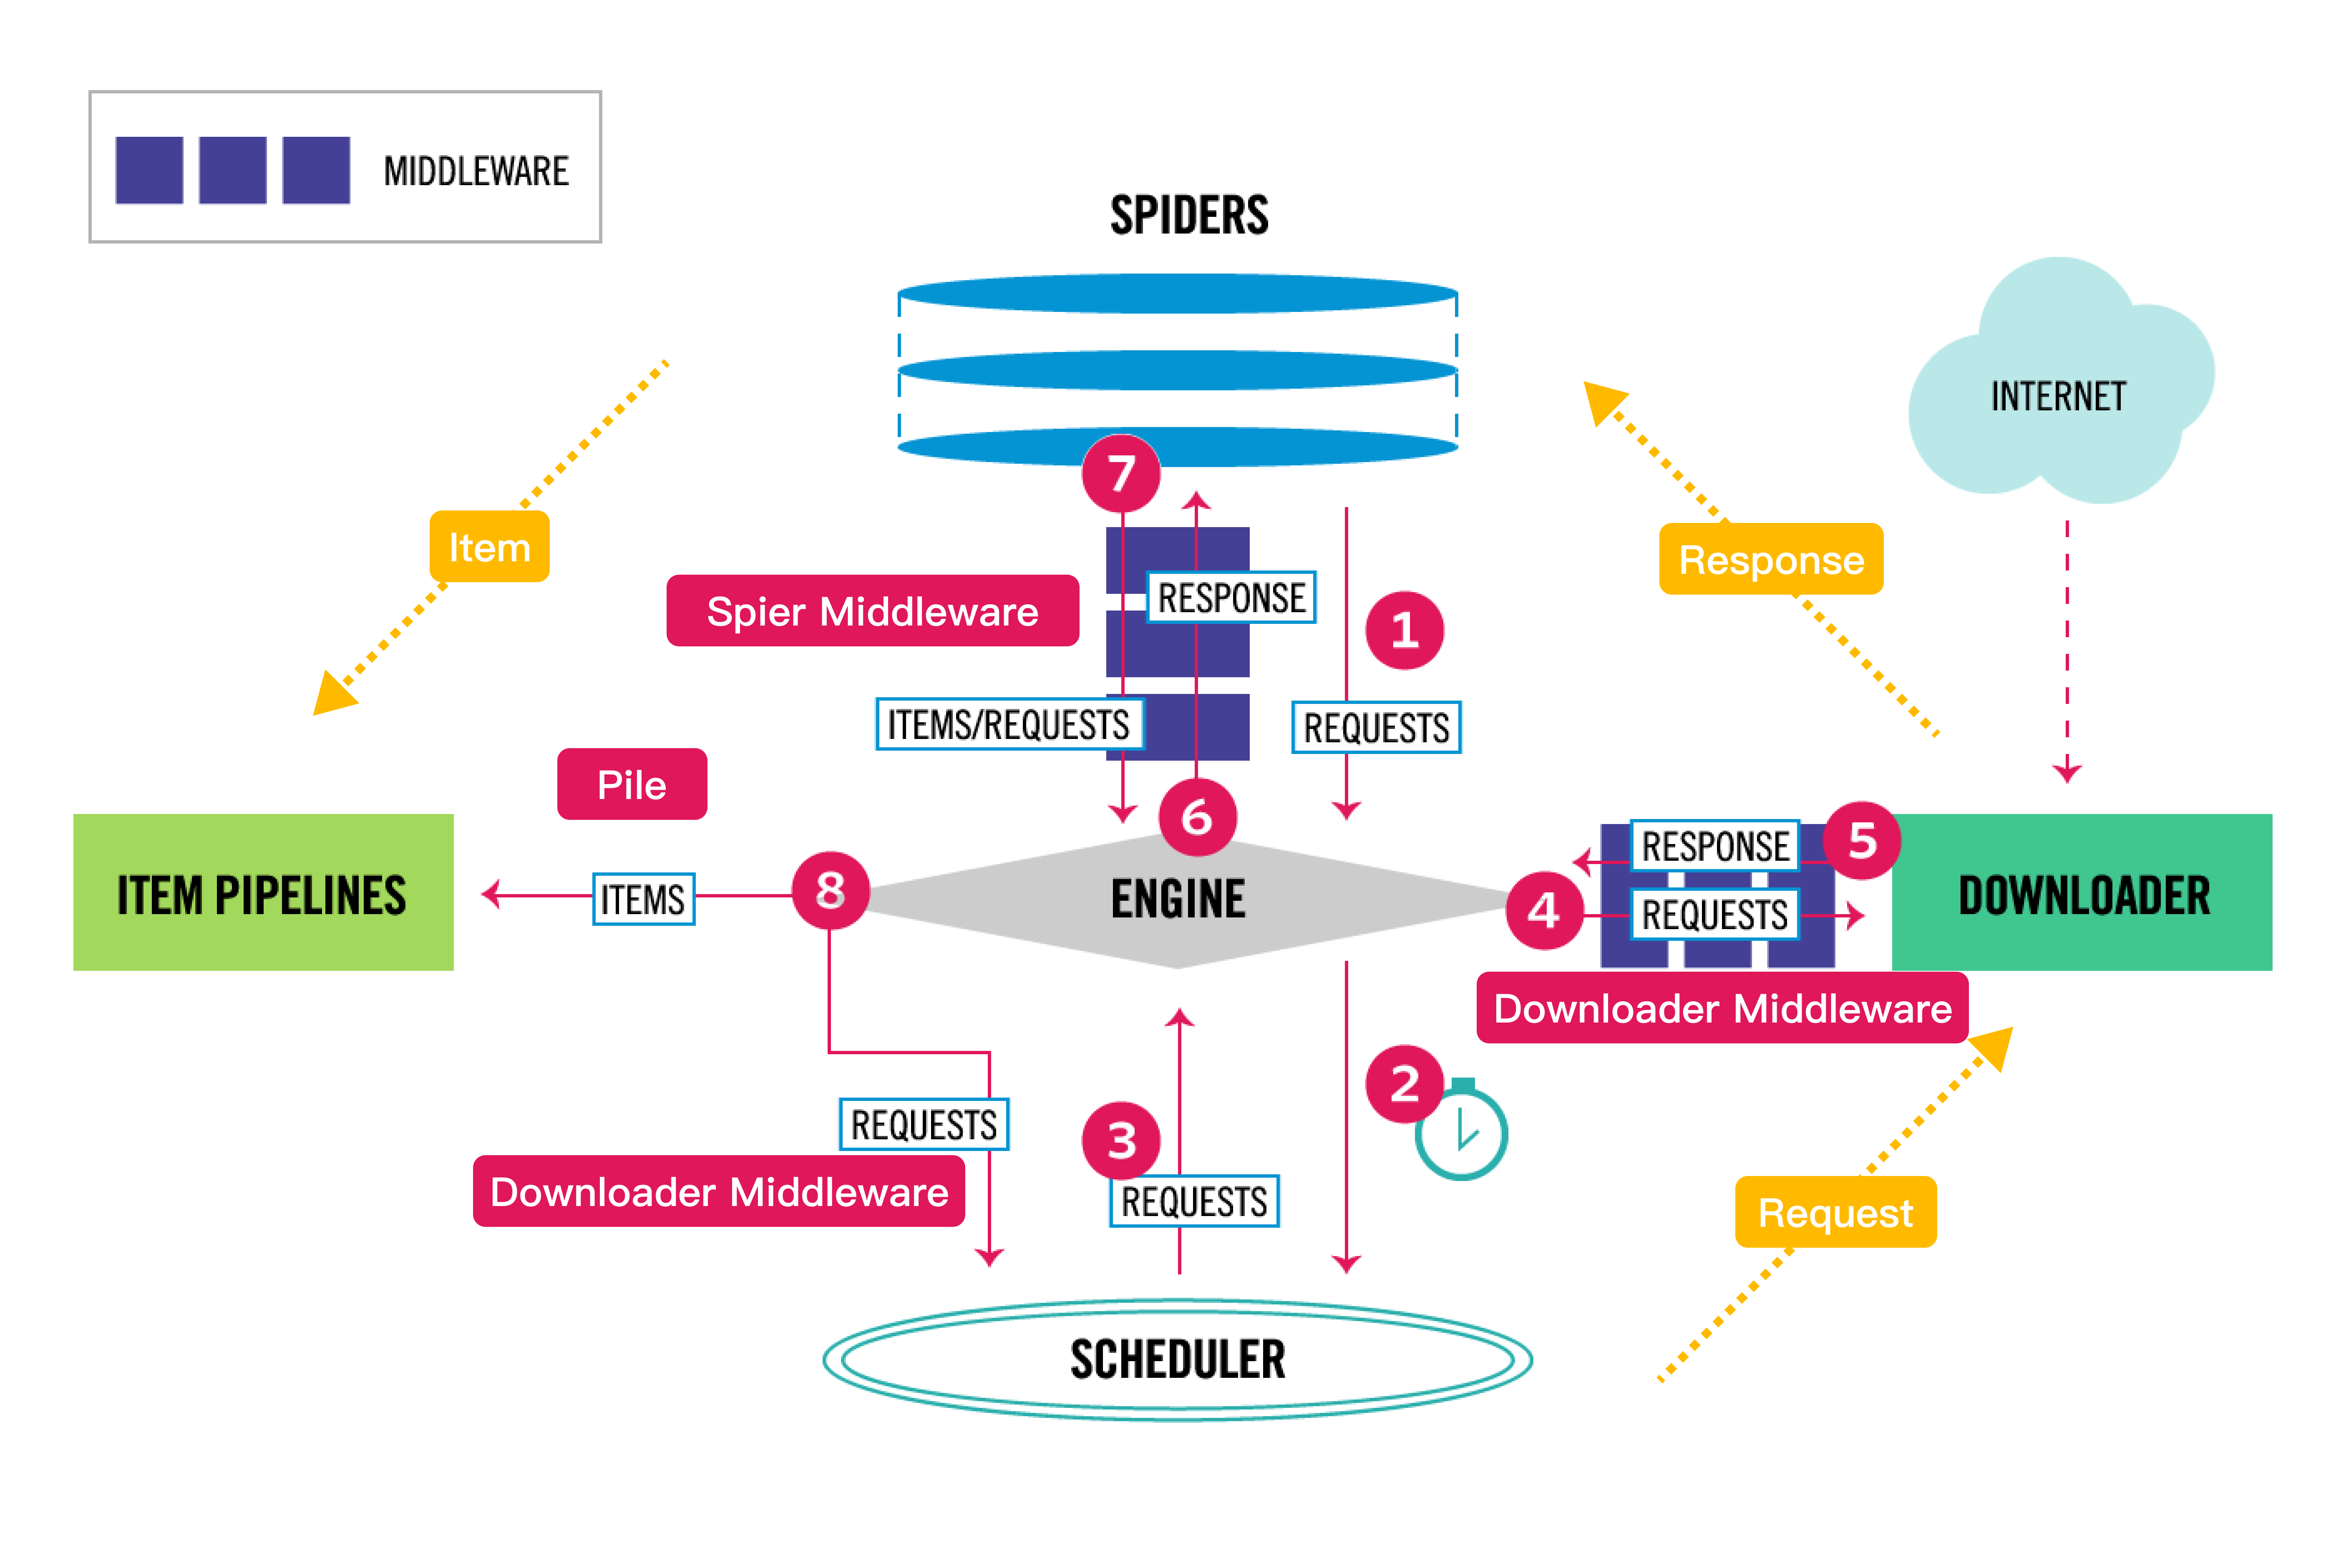
架构图
Selector (HTML)选择器
选择器构建
scrapy selector 是一个用于从 HTML 或 XML 文档中提取数据的类,它支持 XPath 和 CSS 选择器语法
通过 response或text传入html文档
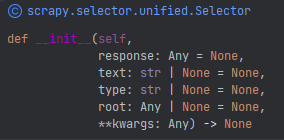
from scrapy.selector import Selector


body = "<html><body><span>good</span></body></html>"
Selector(text=body).xpath("//span/text()").get()
from scrapy.selector import Selector
from scrapy.http import HtmlResponse


response = HtmlResponse(url="http://example.com", body=body, encoding="utf-8")
Selector(response=response).xpath("//span/text()").get()
使用scrapy选择器,可以方便的处理html文档,类似于bs4.Beautifulsoup
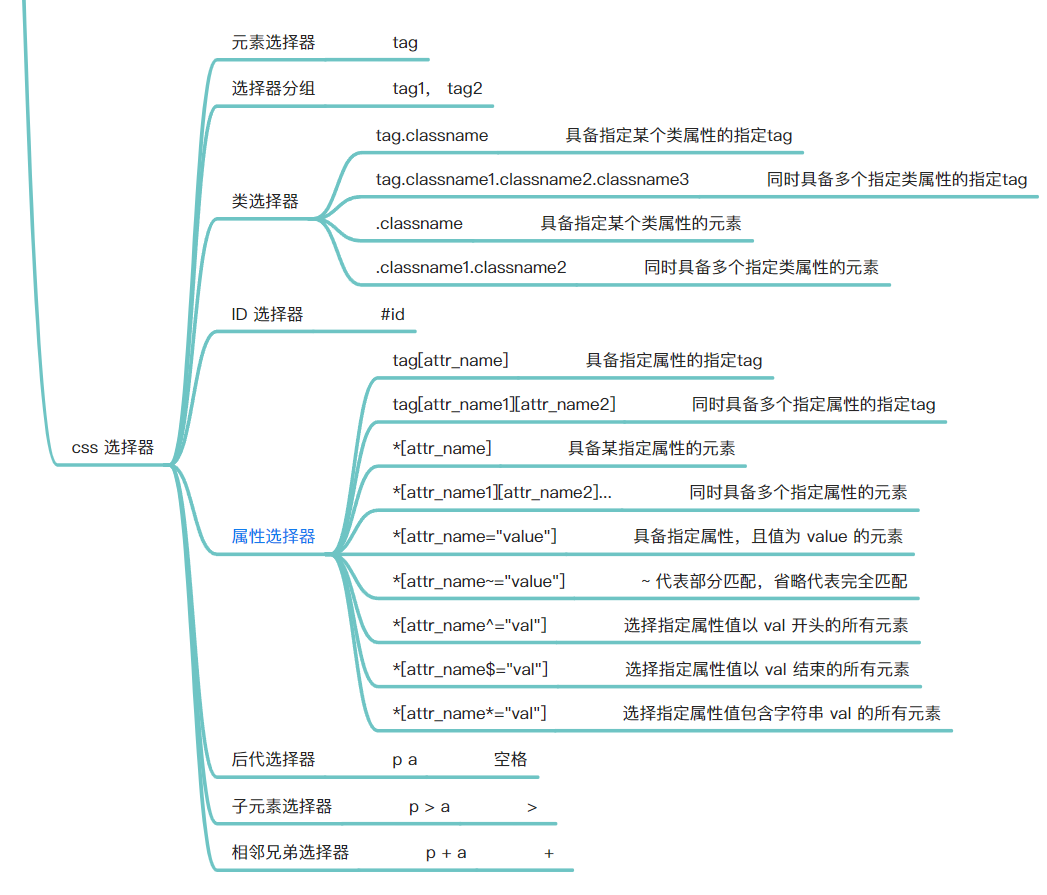
css 选择器 和 xpath 选择器
css 选择器和xpath 选择器的返回内容是Selector示例,所以支持链式混合调用
Selecotor.css("img").xpath("@src").getall()
['image1_thumb.jpg',
'image2_thumb.jpg',
'image3_thumb.jpg',
'image4_thumb.jpg',
'image5_thumb.jpg']
css 选择器增强
标准的 CSS 选择器是不支持获取文本节点或者html元素的属性值的,但scrapy实现了这点:
- 使用
::text获取text node 文本节点 - 使用
::attr(attr_name)获取属性值字符串 Selector实例也支持.attrib属性获取html元素获取属性值
response.css("title::text").get()
'Example website'

response.css("a::attr(href)").get()
'https://www.baidu.com'

response.css("a").attrib['href']
response.css("img").attrib["src"]
更复杂的用法
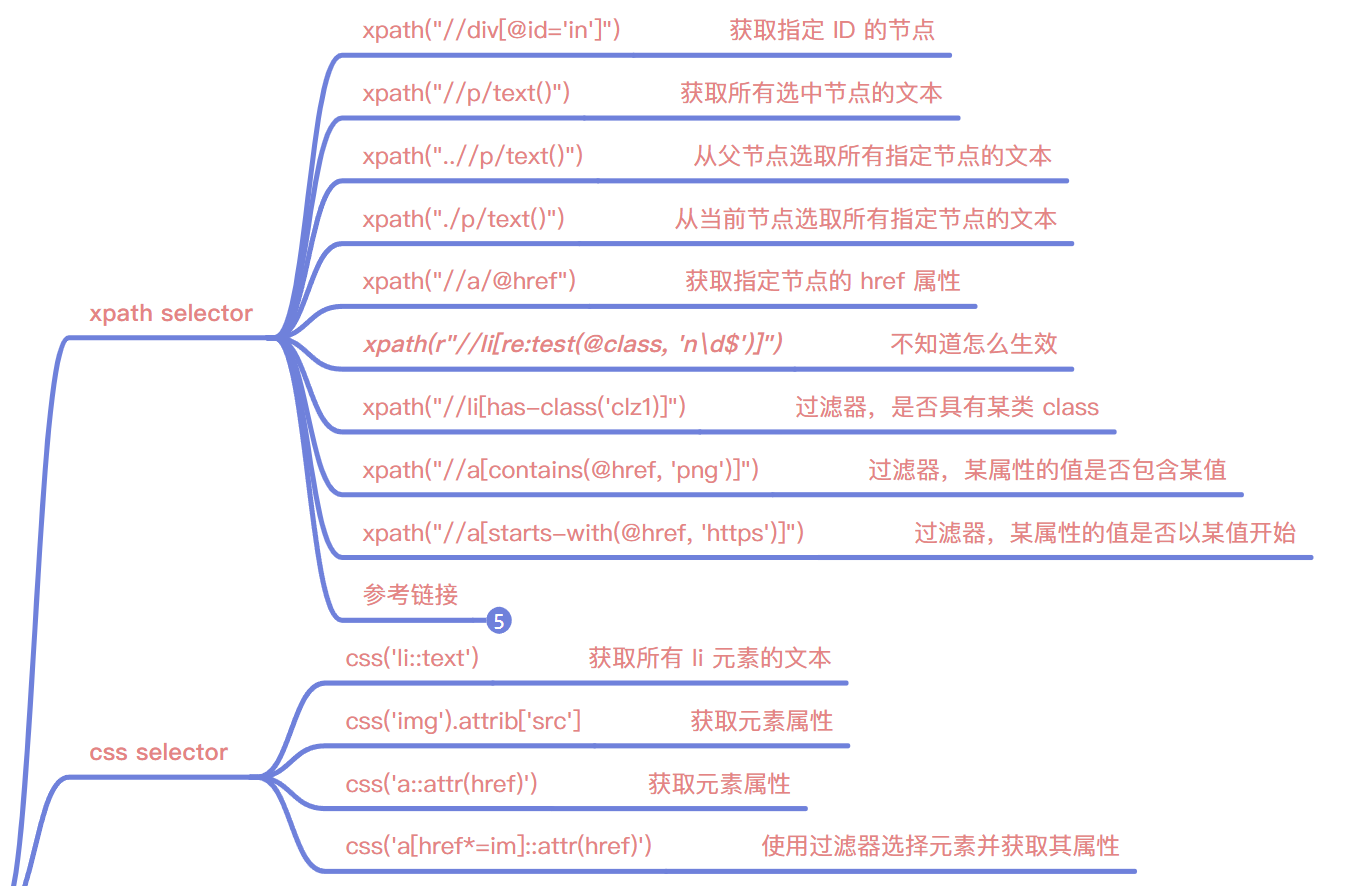
xpath 选择器
- xpath 选择器使用
text()获取文本节点 - xpath 选择器使用
@attr_name获取字符串格式的属性值 Selector实例也支持.attrib属性获取html元素获取属性值
response.xpath("//title/text()").getall()
['Example website']

response.xpath("//title/text()").get()
'Example website'

response.css("img").xpath("@src").getall()
['image1_thumb.jpg',
'image2_thumb.jpg',
'image3_thumb.jpg',
'image4_thumb.jpg',
'image5_thumb.jpg']

response.xpath("//a").attrib['href']
response.xpath("//img").attrib["src"]
更复杂的用法
get()和getall()
get 和 getall 是 scrapy selector 的两个常用方法,
:::danger
注意:
- 想要获取选择器对象中的文本数据时,必须使用 get 或 getall 方法,他们返回的期物是:
- get -> str | None
- getall -> list[str]
:::
它们都可以将选择器找到的数据从Selector对象转换为Unicode字符串,但是有一些区别:
get方法将始终以字符串形式返回选择器找到的第一项。如果选择器没有找到任何数据,它将返回None。例如:
from scrapy import Selector

sel = Selector(text='<p>Hello</p><p>World</p>')

sel.xpath('//p/text()').get()
'Hello'
sel.xpath('//div/text()').get()
None
getall方法将始终返回一个字符串列表,其中包含您的选择器找到的所有项目。如果选择器没有找到任何数据,它将返回一个空列表。例如:
from scrapy import Selector

sel = Selector(text='<p>Hello</p><p>World</p>')

sel.xpath('//p/text()').getall()
['Hello', 'World']

sel.xpath('//div/text()').getall()
[]
scrapy 发起请求
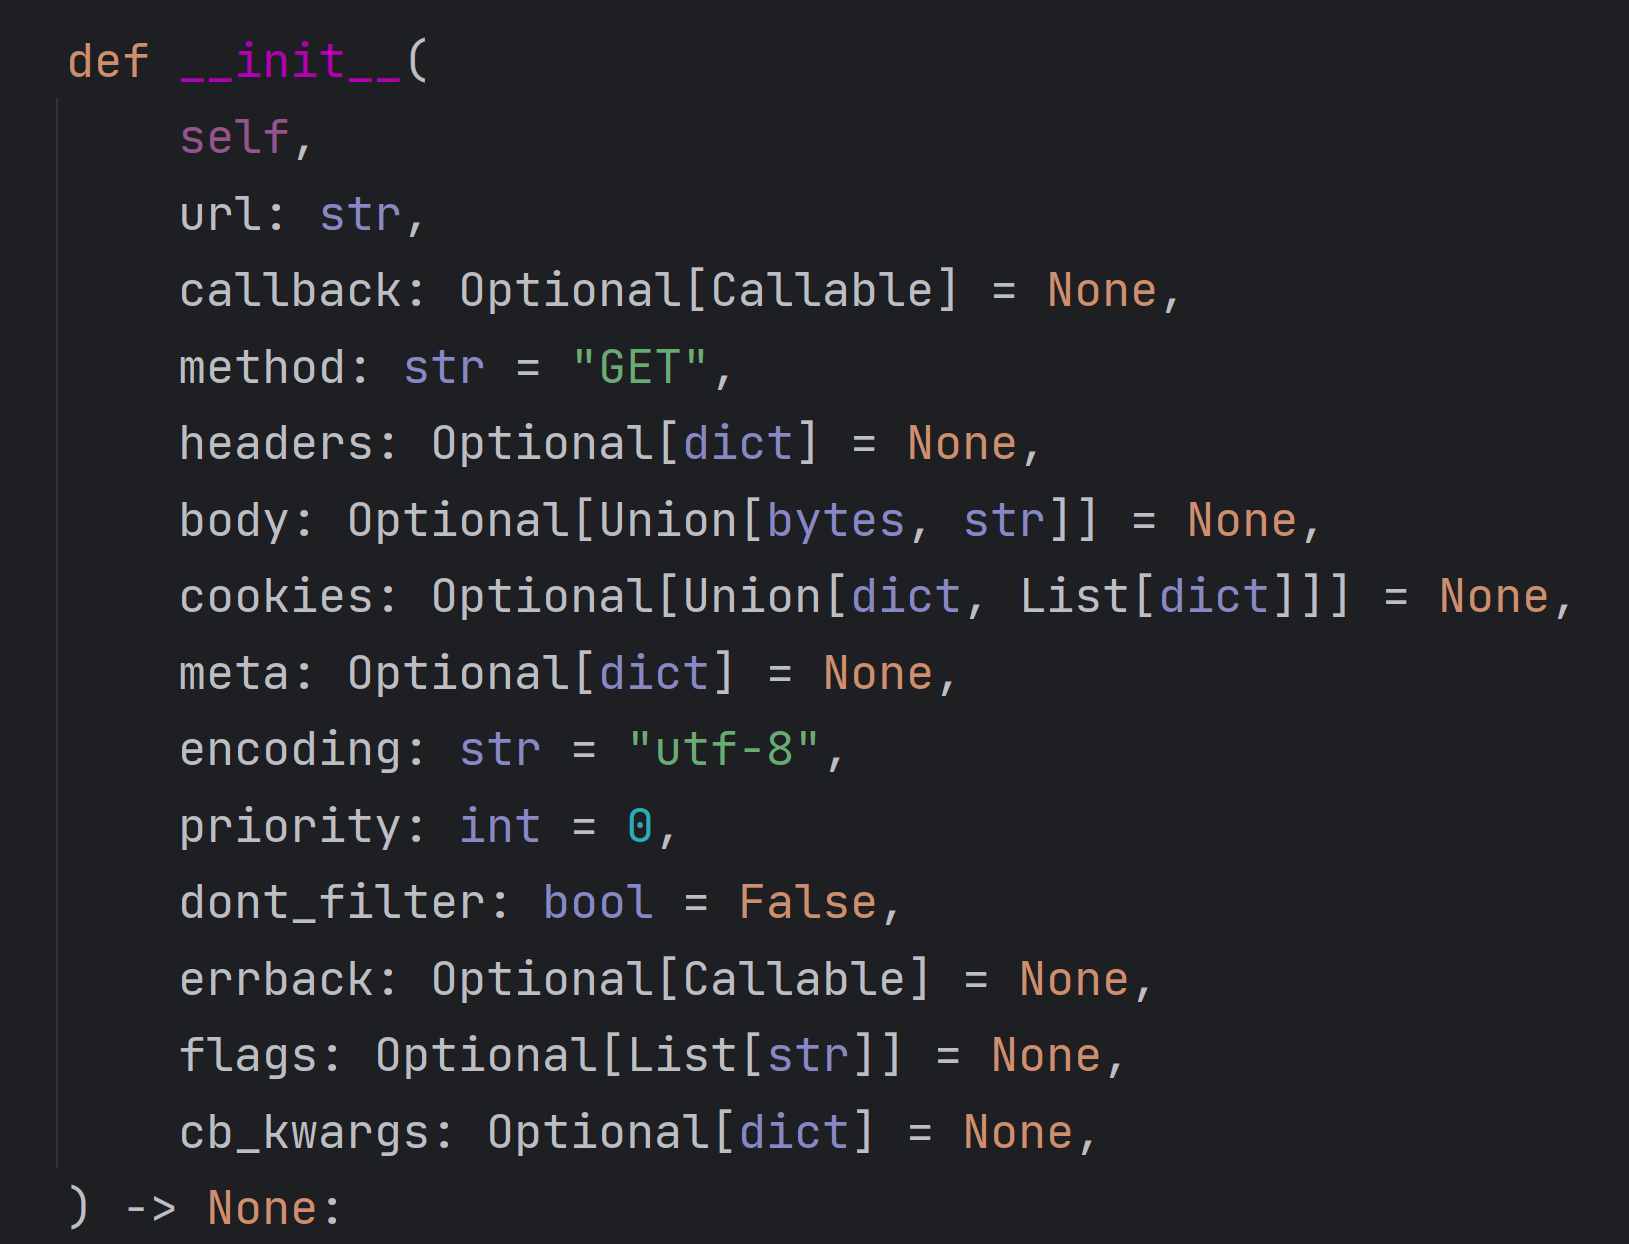
from scrapy.http import Request
SETTINGS 设置相关
设置覆盖
使用Scrapy的三种自定义配置方法。😊
命令行中使用-s选项来指定或者覆盖某些跑诶之
第一种方法是在命令行中使用-s选项来指定或覆盖某些配置,例如日志文件、并发数、自定义变量等。这些配置会应用于当前运行的爬虫,优先级高于settings.py文件。例如,如果你想让myspider爬虫的下载延迟为 2 秒,并把日志输出到scrapy.log文件中,你可以这样运行:
scrapy crawl myspider -s DOWNLOAD_DELAY=2 -s LOG_FILE=scrapy.log
在爬虫类中定义custom_settings
:::danger
比如 Request 默认使用的是 SETTINGS.py 中的 HEADERS, 可以使用此项替换
:::
第二种方法是在爬虫类中定义custom_settings属性来指定或覆盖某些配置,例如日志文件、并发数、中间件、管道等。这些配置会应用于当前的爬虫类,优先级高于settings.py文件和命令行选项。例如,如果你想让myspider爬虫的下载延迟为 2 秒,并使用自定义的管道IndexPipeline来处理数据,你可以这样定义:
import scrapy

class MySpider(scrapy.Spider):
    name = "myspider"
    # set custom settings
    custom_settings = {
        "DOWNLOAD_DELAY": 2,
        "ITEM_PIPELINES": {
            "freedom.pipelines.IndexPipeline": 300
        }
    }
:::danger
通常更好的做法是实现UPDATE_SETTINGS(),并且在那里设置的设置应该显式使用“Spider”的优先级:
:::
import scrapy


class MySpider(scrapy.Spider):
    name = "myspider"

    @classmethod
    def update_settings(cls, settings):
        super().update_settings(settings)
        settings.set("SOME_SETTING", "some value", priority="spider")
在命令行中使用-a选项来传递自定义参数
第三种方法是在命令行中使用-a选项来传递自定义参数给爬虫类,例如批次号、数据源名称等。这些参数可以在爬虫类的__**init__**方法或from_crawler方法中获取,用于控制爬虫的逻辑或行为。例如,如果你想让myspider爬虫根据不同的数据源名称来爬取不同的网站,你可以这样运行:
scrapy crawl myspider -a source_name=google -a arg2=haha
然后在爬虫类中这样获取和使用参数:
import scrapy

class MySpider(scrapy.Spider):
    name = "myspider"

    # 需要在入参处声明 写起来太麻烦
    def __init__(self, source_name=None, *args, **kwargs):
        super(MySpider, self).__init__(*args, **kwargs)
        # get the source name from the command line argument
        self.source_name = source_name

    # 取值更好的一种方式是,使用 get 方法,这样可以同时设置默认值,更通用
    def __init__(self, *args, **kwargs):
        super().__init__(*args, **kwargs)
        # get the source name from the command line argument
        self.source_name = kwargs.get('source_name', 'default_value')

    def start_requests(self):
        # use the source name to generate the start urls
        if self.source_name == "google":
            start_urls = ["https://www.google.com/"]
        elif self.source_name == "bing":
            start_urls = ["https://www.bing.com/"]
        else:
            start_urls = []
        for url in start_urls:
            yield scrapy.Request(url, callback=self.parse)
访问 SETTINGS 设置
在 Spiser 中,可以通过self.settings进行访问:
class MySpider(scrapy.Spider):
    name = "myspider"
    start_urls = ["http://example.com"]

    def parse(self, response):
        print(f"Existing settings: {self.settings.attributes.keys()}")
        for k, v in self.settings.items():
    		print(k, v)
默认 SETTINGS 设置的键值
命令行
使用scrapy.cmdline.excute执行爬虫
from multiprocessing import Process
from scrapy.cmdline import execute

command = 'scrapy crawl pdf_downloader'
proc = Process(target=execute, args=[c.split()])
proc.start()
proc.join()
pass
传入自定义参数的命令构建
:::danger
关键字参数传入后,类型为 str ,如果需要使用参数,要注意类型转换
:::
scrapy crawl pdf_downloade -a arg1=123 -a arg2=456
spider如何使用关键字参数
覆写spider的__init__方法,然后进行进行接收
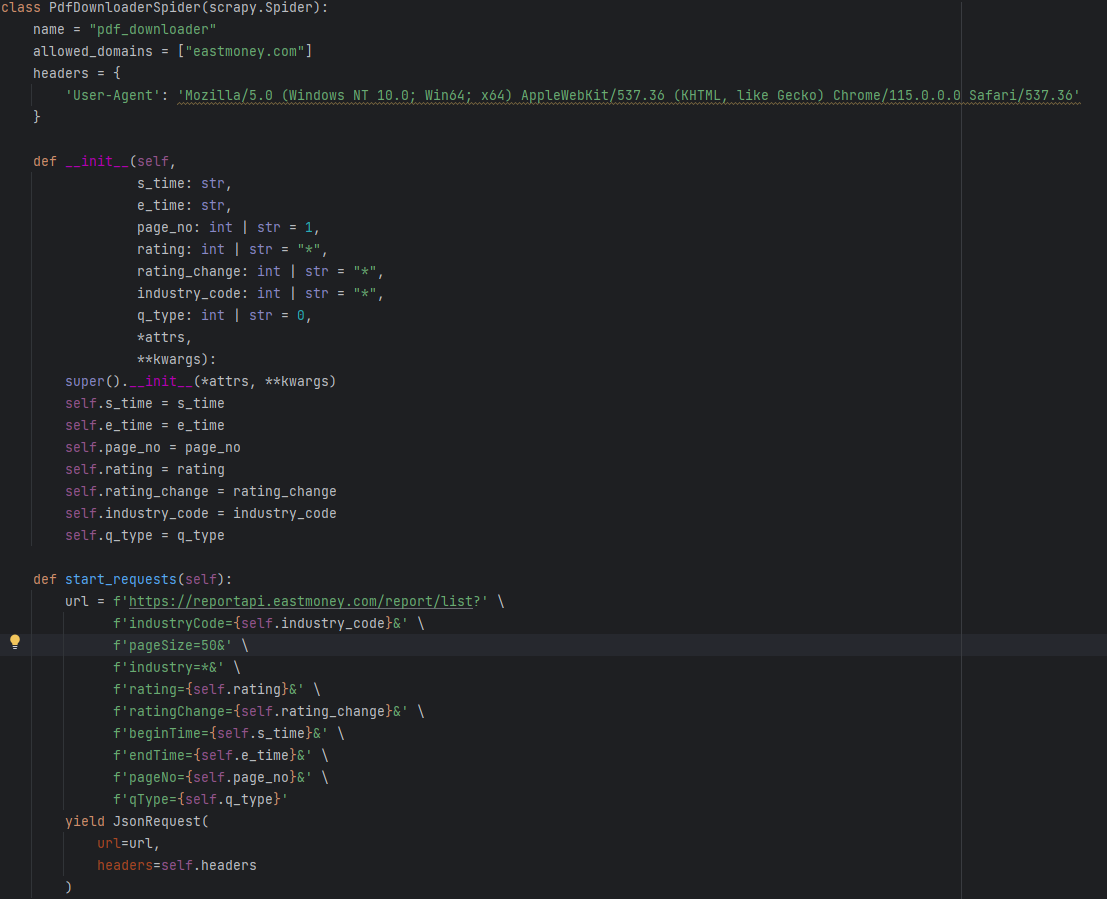
    def __init__(self,
                 s_time: str,
                 e_time: str,
                 page_no: int | str = 1,
                 rating: int | str = "*",
                 rating_change: int | str = "*",
                 industry_code: int | str = "*",
                 q_type: int | str = 0,
                 *attrs,
                 **kwargs):
        super().__init__(*attrs, **kwargs)
        self.s_time = s_time
        self.e_time = e_time
        self.page_no = page_no
        self.rating = rating
        self.rating_change = rating_change
        self.industry_code = industry_code
        self.q_type = q_type
文件下载的实现
Scrapy 自带的 FilesPipeline和ImagesPipeline用来下载图片和文件非常方便,根据它的官方文档[1]说明,我们可以很容易地开启这两个Pipeline。
如果只是要下载图片,那么用FilesPipeline和ImagesPipeline都可以,毕竟图片也是文件。但因为使用 ImagesPipeline要单独安装第三方库Pillow,所以我们以FilesPipeline为例来进行说明。
定义 Items
首先定义任意一个items,需要确保这个items 里面,必须包含file_urls字段和files字段,除了这两个必备字段外,还可以任意增加其他字段:
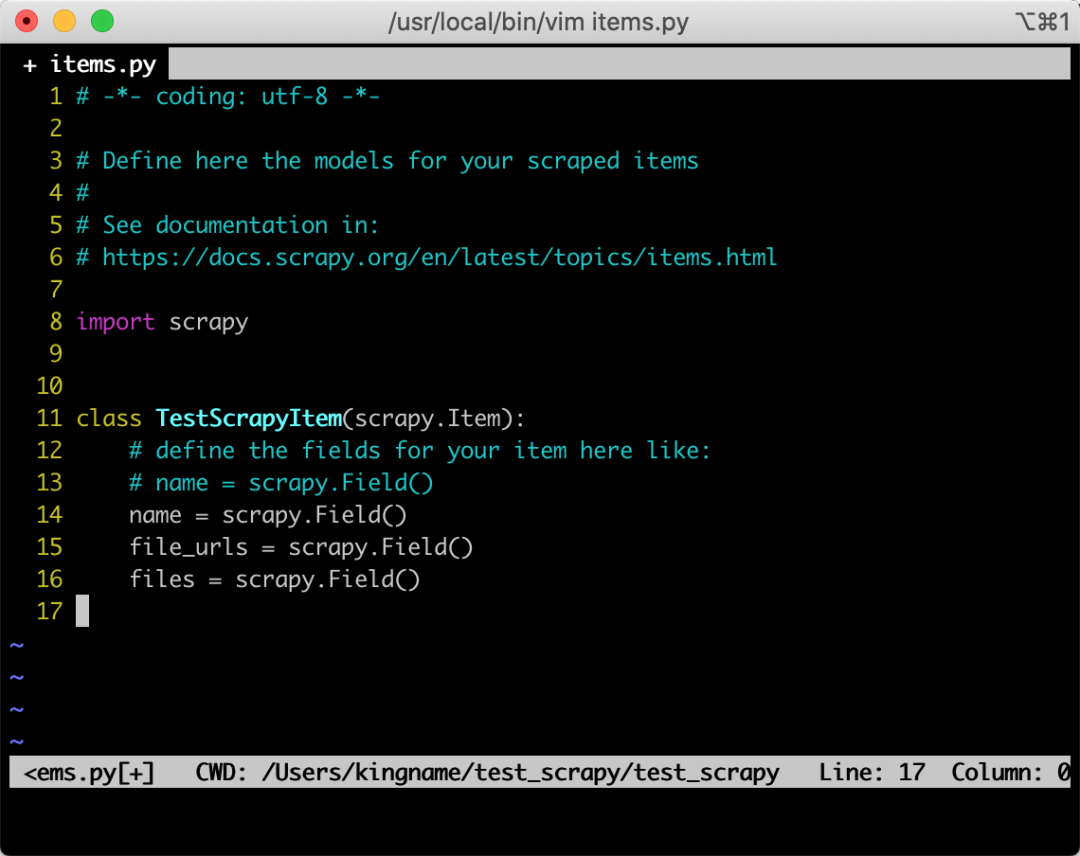
启动 FilesPipeline 和 配置FILES_STORE
启用 FilesPipeline
在settings.py中,找到ITEM_PIPELINES配置,如果它被注释了,那么就解除注释。然后添加如下的配置:
'scrapy.pipelines.files.FilesPipeline': 1
配置 FILES_STORE
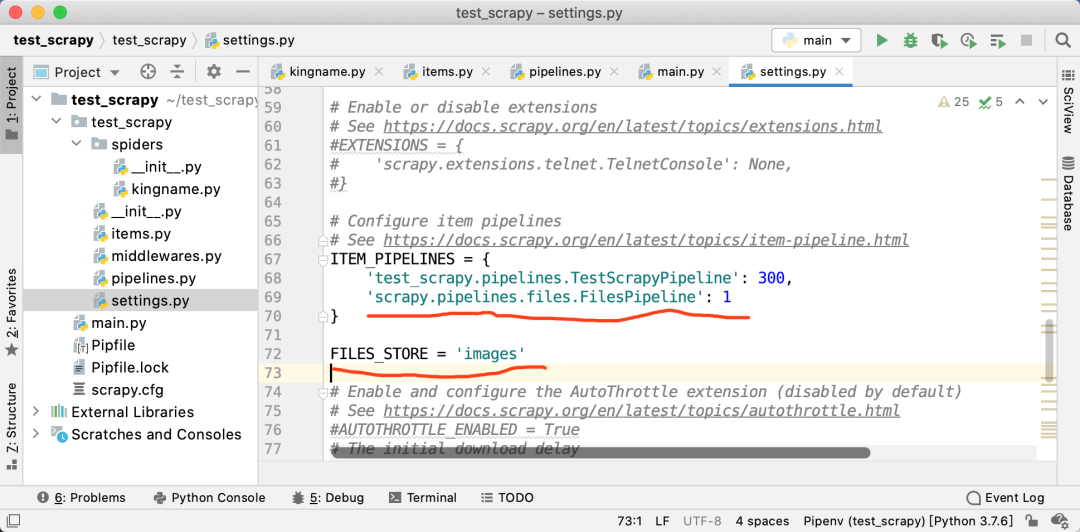
下载图片
接下来,就进入到我们具体的爬虫逻辑中了。在爬虫里面,你在任意一个parse函数中提取到了一张或者几张图片的URL后,把它(们)以列表的形式放入到item里面的file_urls字段中。如下图所示
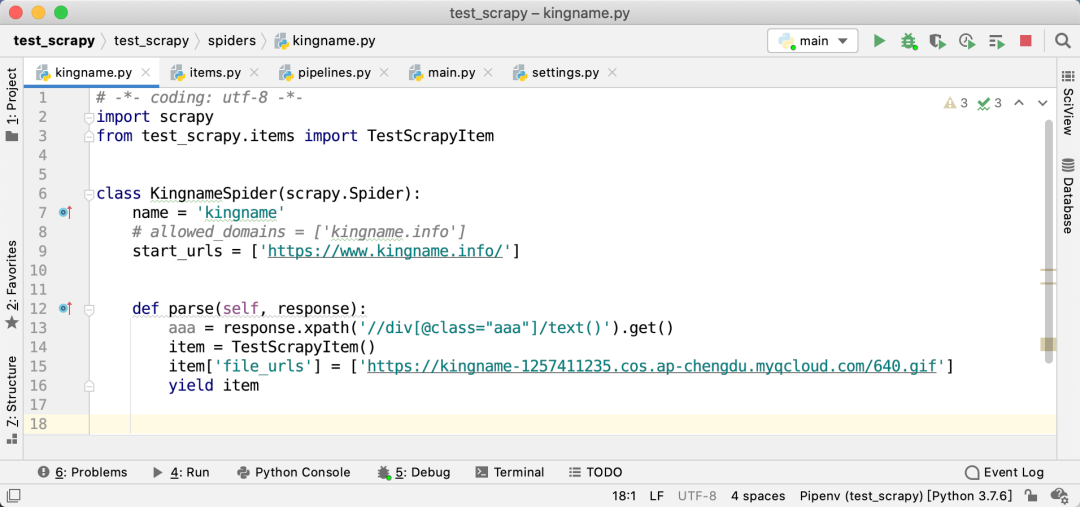
注意,此时files字段不需要设置任何的值。其他非必需字段就根据你的需求只有设置即可。
获取结果
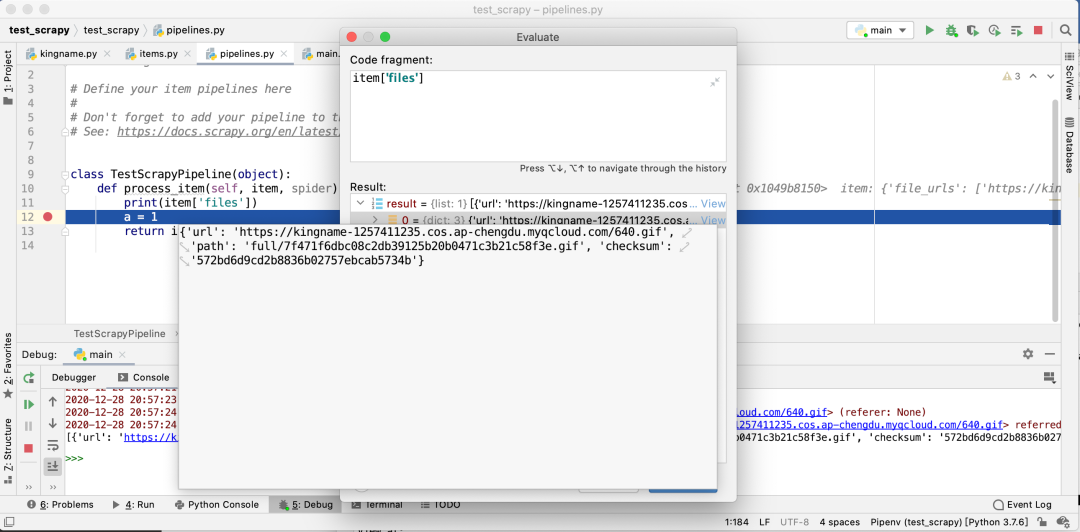
由于设置了scrapy.pipelines.images.FilesPipeline的优先级为1,是最高优先级,所以它会比所有其他的Pipeline更先运行。于是,我们可以在后面的其他Pipeline中,检查item的files字段,就会发现需要的图片地址已经在里面了。如下图所示
修改请求头
Scrapy 在使用FilesPipeline和ImagesPipeline时,是不会设置请求头的
为了手动加上请求头,我们可以自己写一个pipeline,继承FilesPipeline但覆盖get_media_requests方法,如下图所示:

注意,在实际使用中,你可能还要加上 Host 和 Referer。
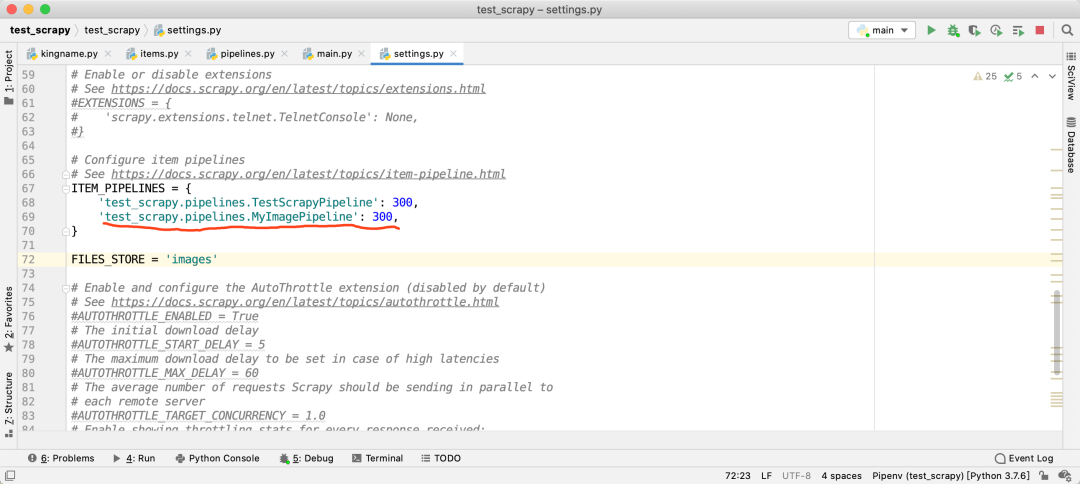
然后修改settings.py中的ITEM_PIPELINES,指向我们自定义的这个pipeline:
中间件 和 Pipeline 的出入口方法、处理方法研究
下载器中间件(构成方法 与 输出期物)
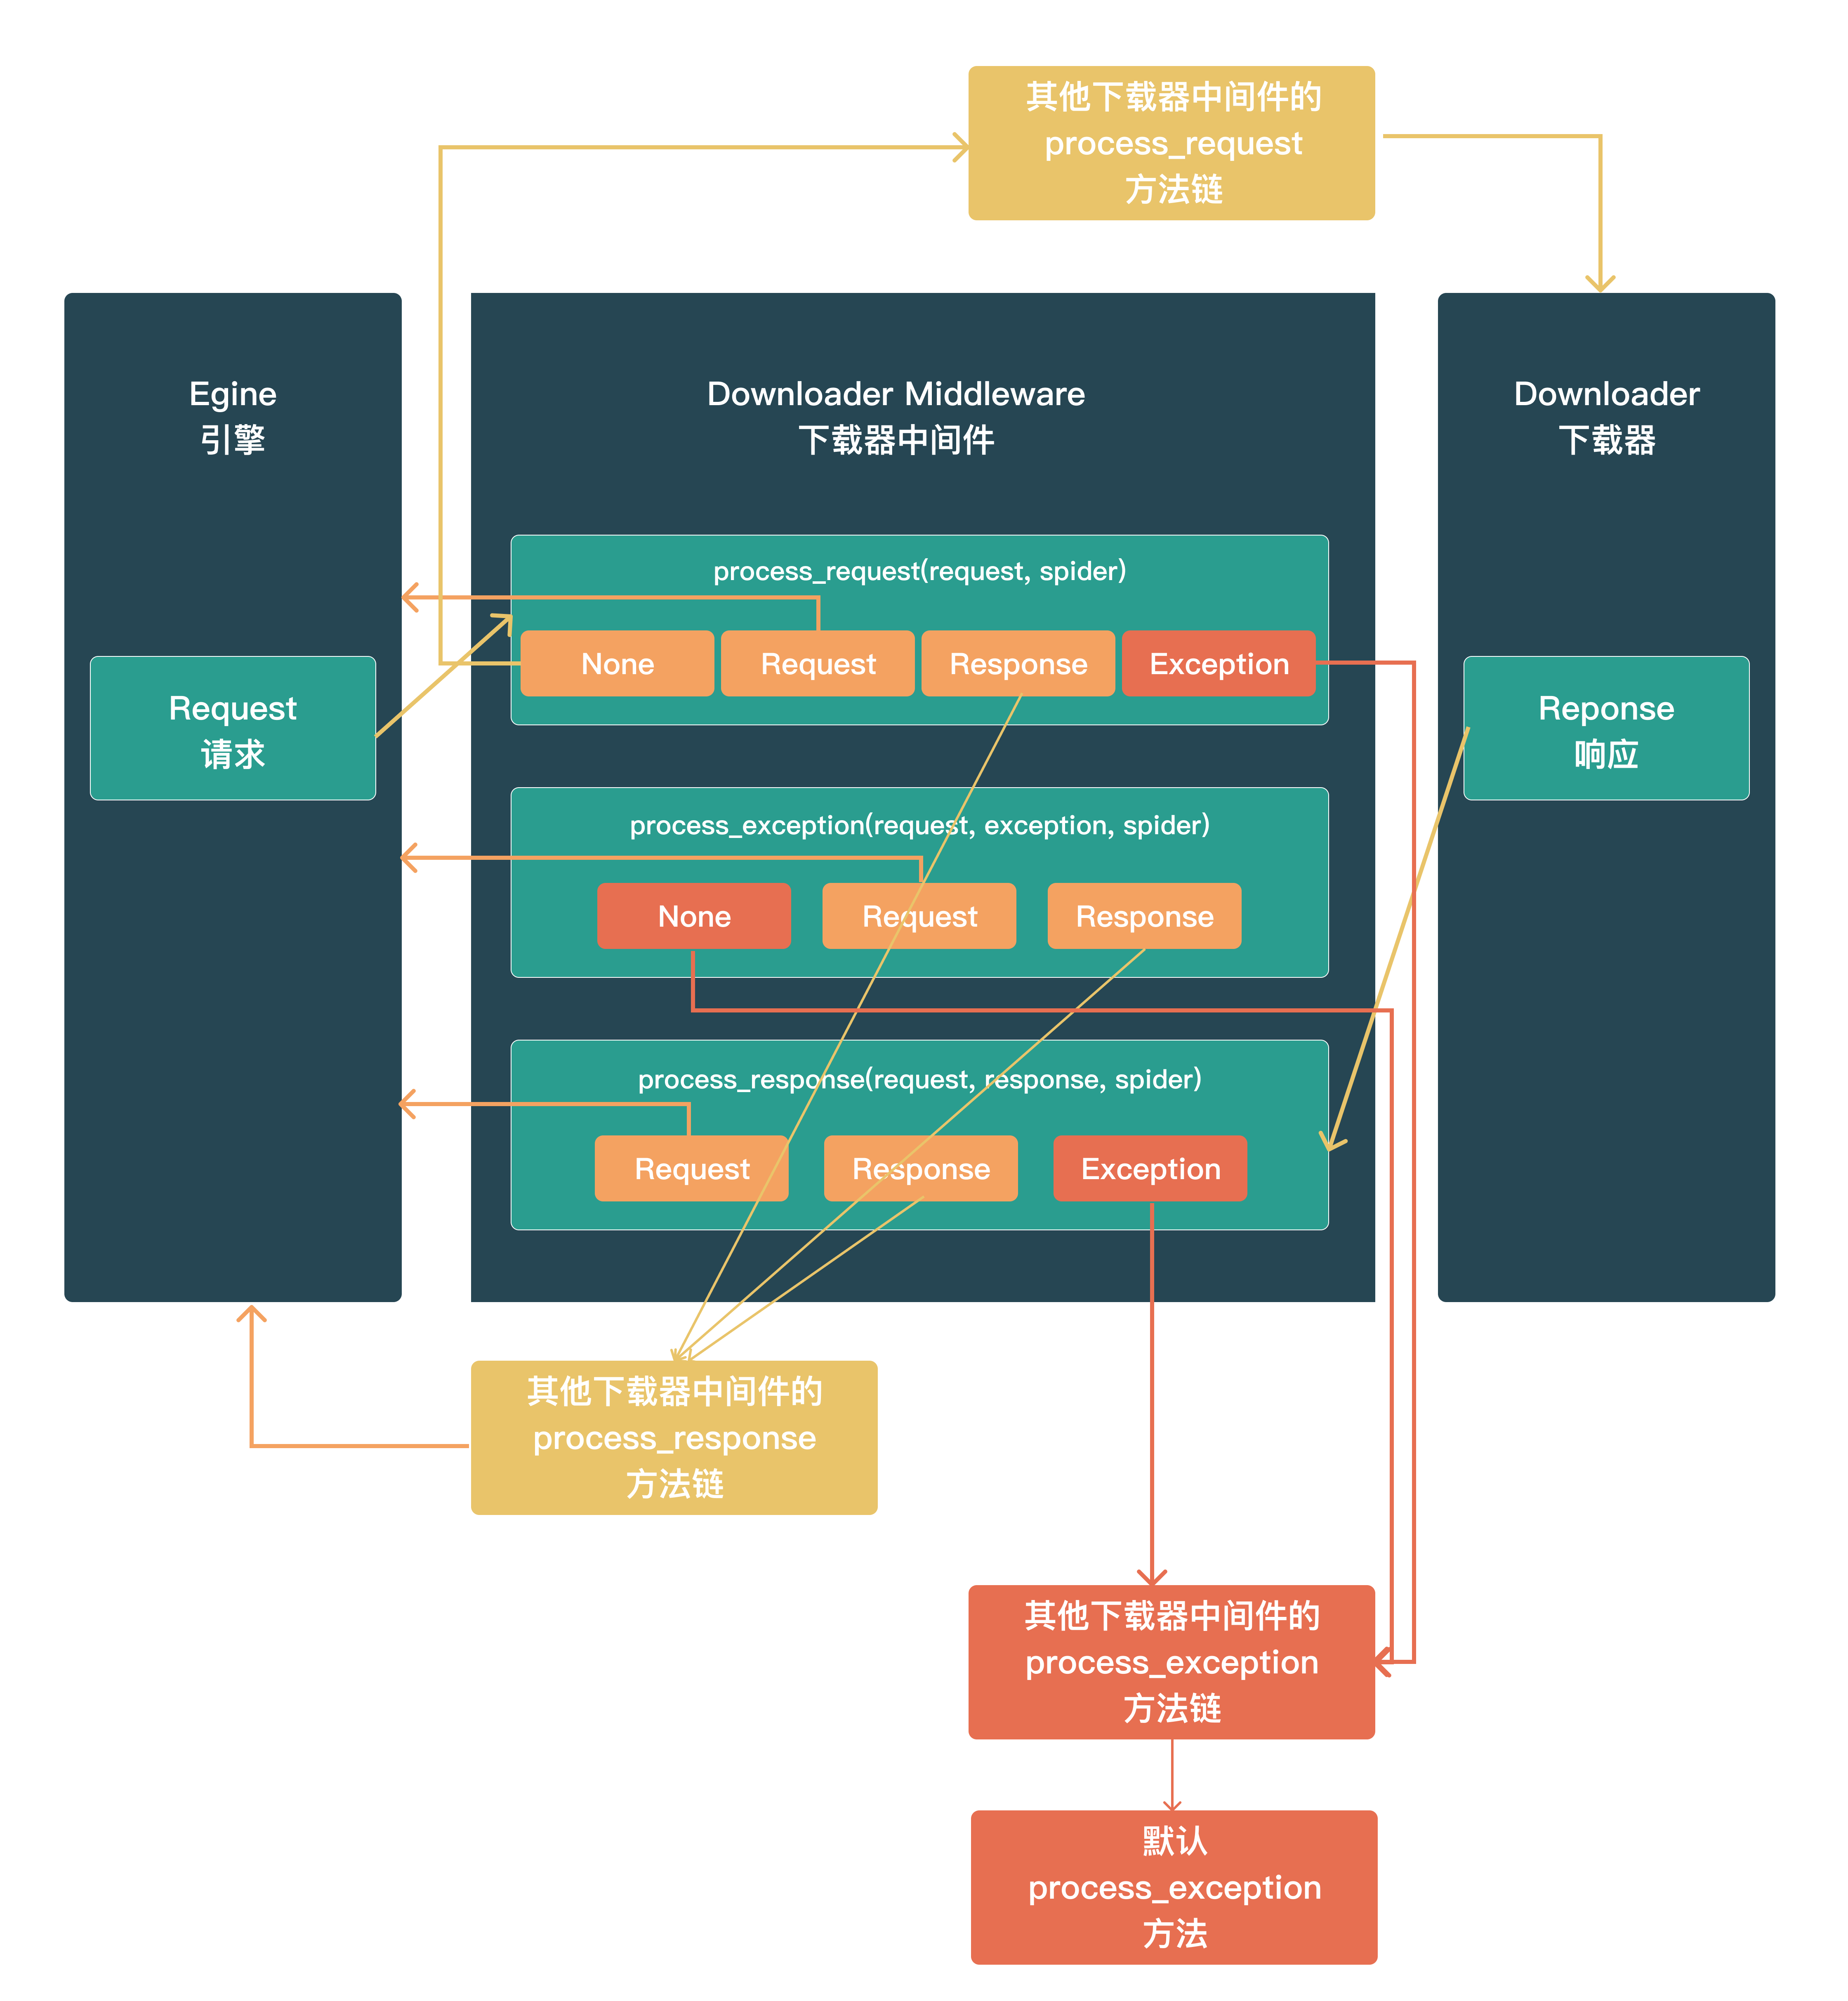
process_request(request, spider)
调用时机:对于通过_ 下载中间件 _的每个request 请求,都会调用此方法。
输出期物:
- None:交付框架中的其他 _下载器中间件 _的
process_request方法链处理,最后交付给Downloader 下载器执行 - Response:交付框架中的其他_ 下载器中间件 _的
process_response方法链处理,最后将response返回给Egine 引擎 - Request:返回给
Egine 引擎,参与新一轮的调度请求处理调度 - raise Exception:交付框架中的其他_ 下载器中间件 _的
process_exception方法链处理,如果其他下载器中间件都不处理,最后交给默认的process_exception方法处理
process_response(request, exception, spider)
调用时机:对于通过 下载中间件 的每个response 响应,都会调用此方法。
输出期物:
- Response:交付框架中的其他_ 下载器中间件 _的
process_response方法链处理,最后将response返回给Egine 引擎 - Request:返回给
Egine 引擎,参与新一轮的调度请求处理调度 - raise Exception:交付框架中的其他_ 下载器中间件 _的
process_exception方法链处理,如果其他下载器中间件都不处理,最后交给默认的process_exception方法处理
process_exception(request, response, spider)
调用时机:当下载器或process_request来自下载中间件)引发异常(包括IgnoreRequest异常)时,Scrapy调用process_exception
输出期物:
- None:交付框架中的其他_ 下载器中间件 _的
process_exception方法链处理,如果其他下载器中间件都不处理,最后交给默认的process_exception方法处理 - Response:交付框架中的其他_ 下载器中间件 _的
process_response方法链处理,最后将response返回给Egine 引擎 - Request:返回给
Egine 引擎,参与新一轮的调度请求处理调度
爬虫中间件(构成方法 与 输出期物)
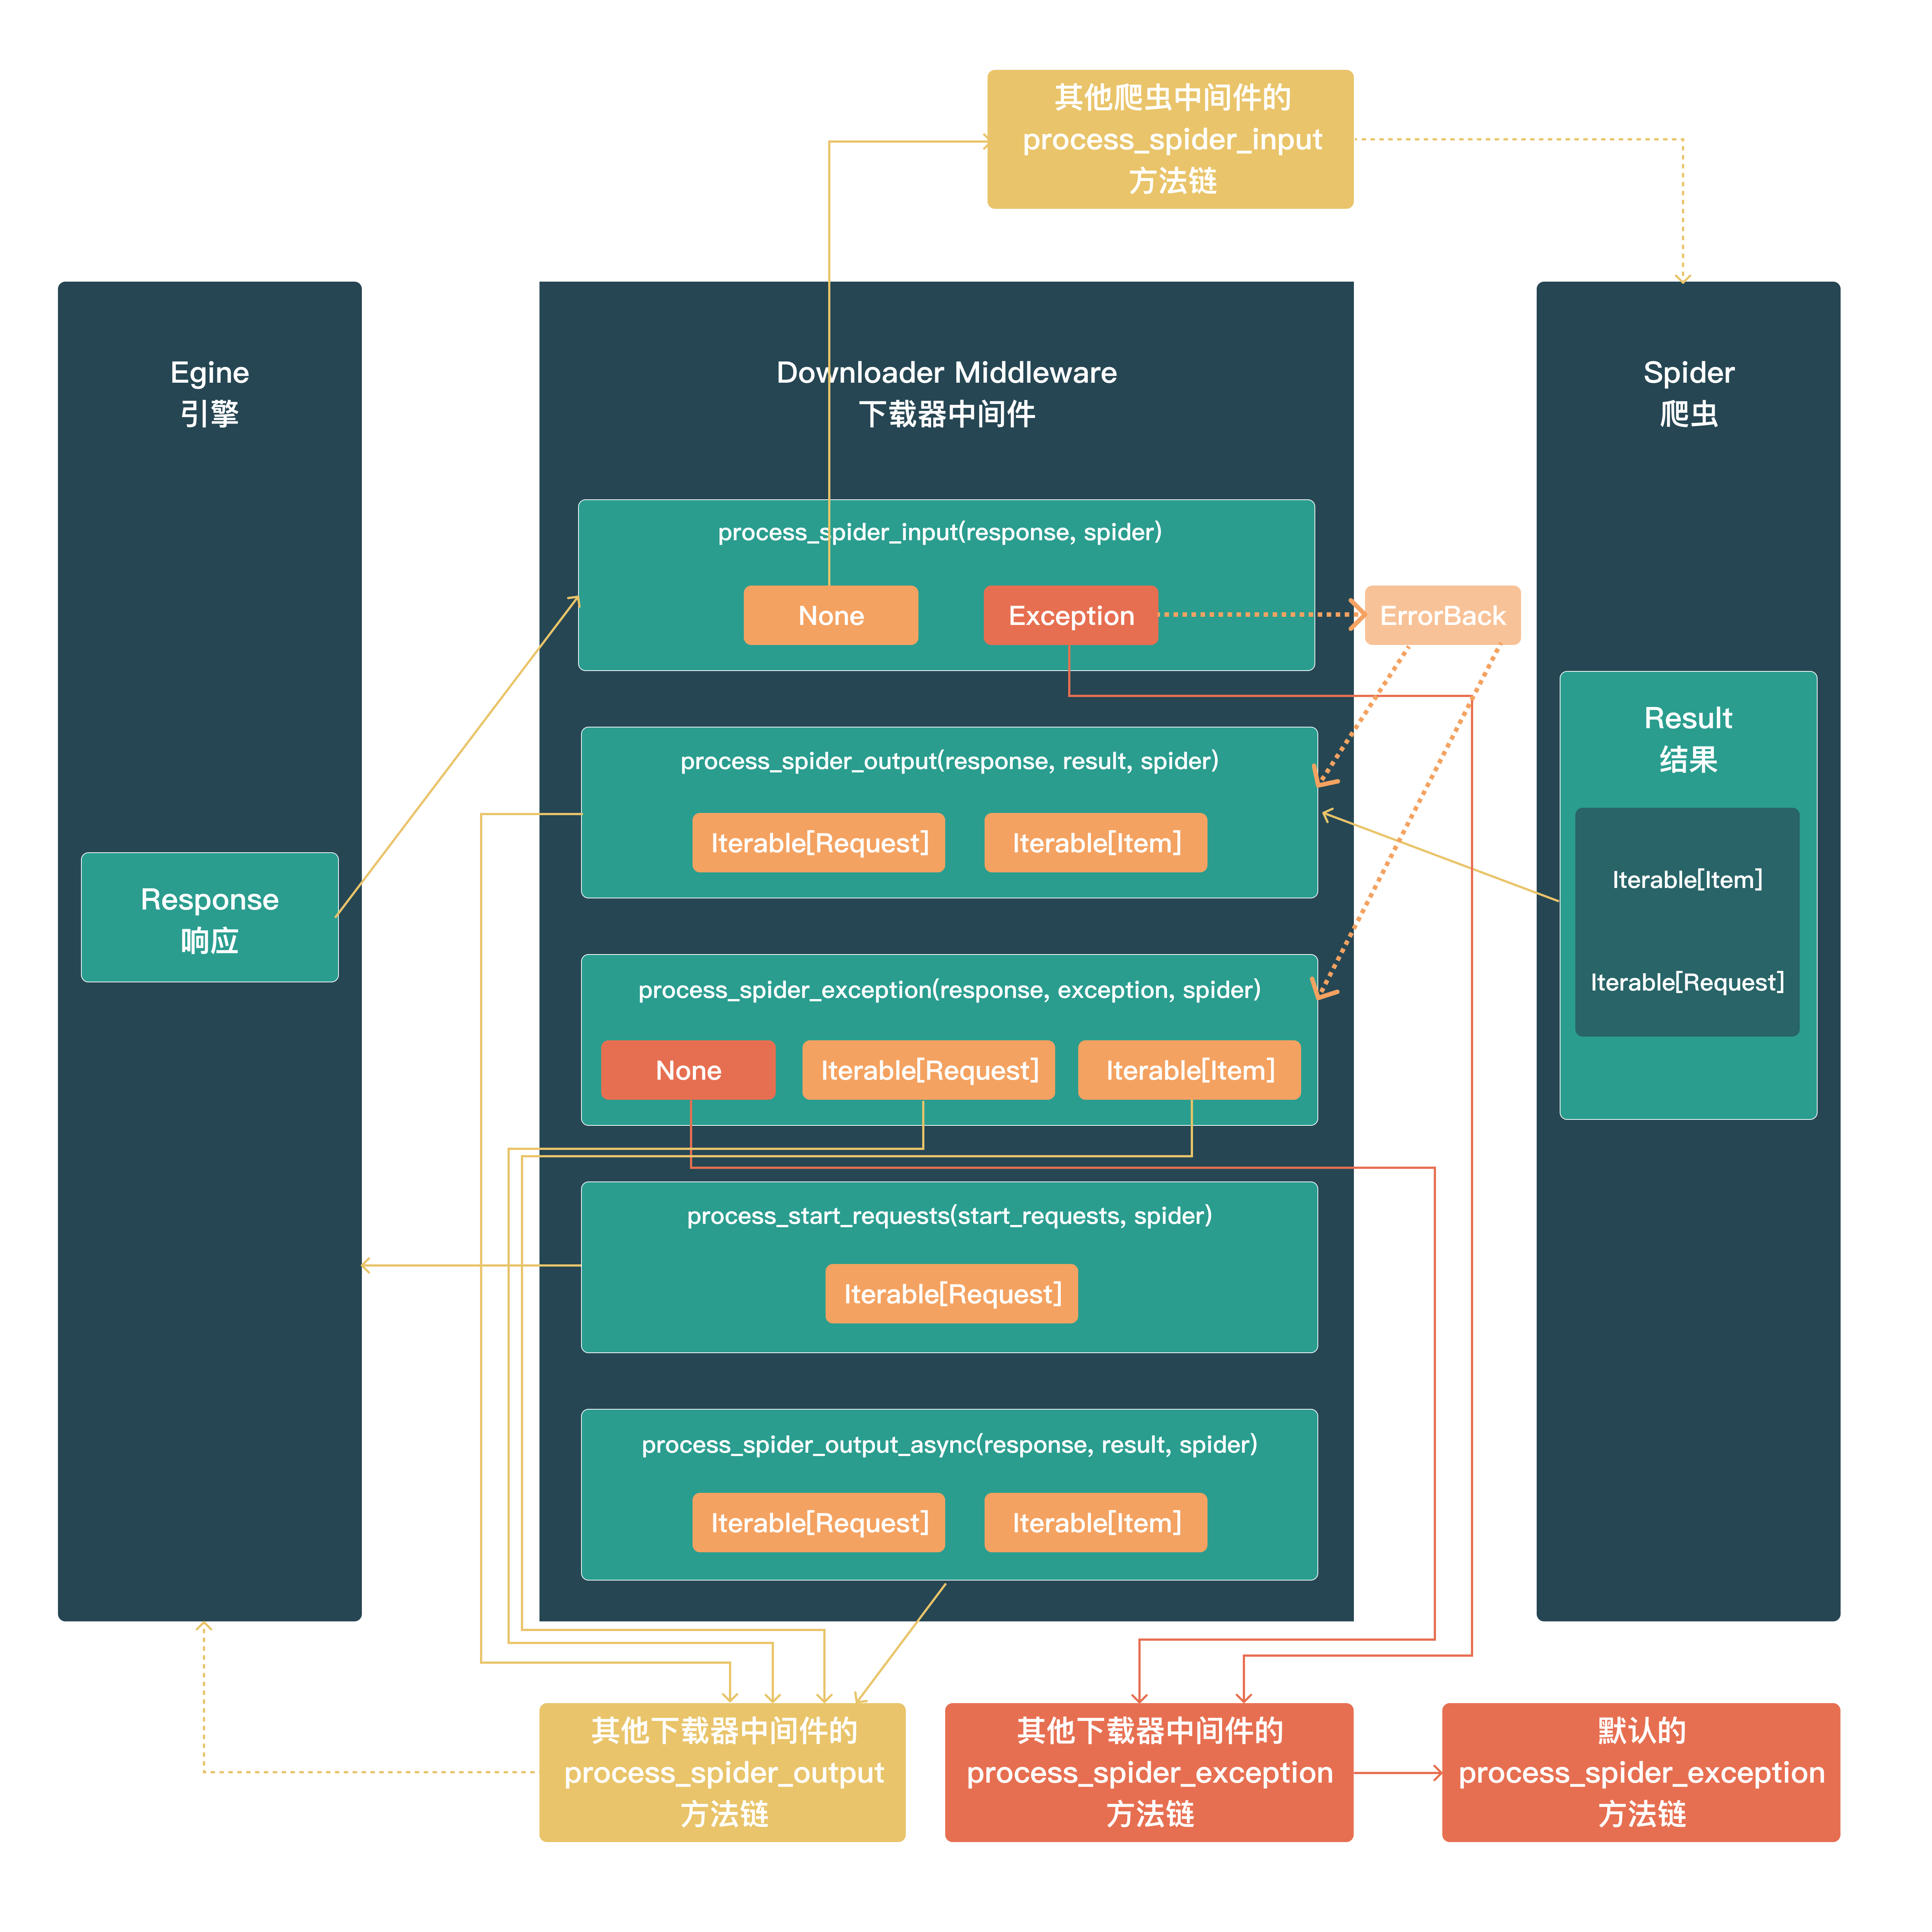
process_spider_input(response, spider)
调用时机:response从Egine 引擎 -->> Spider 爬虫时
输出期物为:
None:进入下一个 爬虫中间件处理流程raise exception:如果引发异常,Scrap y将不会调用任何其他爬虫中间件Process_Spider_Input,并将调用请求errback(如果有),否则它将启动Process_Spider_Exception链。Errback的输出被链接回另一个方向,以供process_Spider_out处理它,或者,如果它引发异常,则链接回process_Spider_Except
process_spider_output(response, result, spider)
调用时机:由Spider 爬虫处理完Response返回Result 结果时;
输出期物(Result的类型)为:
- Result:Iterable[Request | Item]
Iterable[Request]:交付给Egine 引擎进入新一轮的请求调度Iterable[Item]:进入Pipeline管道处理流
process_spider_exception(response, exception, spider)
调用时机:当Spider或Process_Spider_Output()方法(来自以前的 爬虫中间件 )引发异常时,将调用此方法。
输出期物为:
None:交由后续 爬虫中间件 的process_spider_exception进行处理,直到最后没有中间件处理,到达Egine 引擎,由Egine 引擎记录并抛弃- Result:Iterable[Request | Item]:由下一个 爬虫中间件 的
process_spider_output方法接管
process_start_requests(start_requests, spider)
调用时机:爬虫启动时调用,start_requests传递的是一个可迭代对象
输出期物为:
Iterable[Request]:交付给Egine 引擎开始新一轮的请求调度流程
process_spider_output_async(response, result, spider)
pass
Item Pipeline 管道
process_item(self, item, spider)
open_spider(self, spider)
close_spider(self, spider)
classmethodfrom_crawler(cls, crawler)
Request 和 Resonse
常用的通用爬虫类
CrawlSpider
这是最常用的爬取常规网站的 Spider,因为它通过定义一组规则为跟踪链接提供了一种方便的机制。它可能不是最适合你的特定网站或项目的,但它对几种情况来说已经足够通用了,所以你可以从它开始,并根据需要覆盖它,以获得更多的自定义功能,或者只实现你自己的 spider
除了从 Spider 继承的属性(必须指定)外,该类还支持一个新属性:
rules:是一个或多个Rule对象的列表。每个Rule确定了对一个网站的爬取行为。如果多个规则与同一链接匹配,则将根据在该属性中定义的顺序使用第一个规则。parse_start_url(response, **kwargs):pass
Crawling rules
class scrapy.spiders.Rule(
    link_extractor=None,
    callback=None,
    cb_kwargs=None,
    follow=None,
    process_links=None,
    process_request=None,
    errback=None
)
-
link_extractor:定义链接提取器的行为 -
callback:定义提取出来的链接使用哪个回调函数来进行解析 -
cb_kwargs:定义额外关键词参数进行传递 -
follow:决定链接的跟进行为,若为True则进行跟进,否则不跟进;当callback=None时,默认情况follow=True,否则follow=Faske;
:::danger
scrapy 的 crawling rules 中的 follow 参数有以下作用和影响: -
follow 是一个布尔值,表示是否跟随从 link_extractor 中提取的链接继续爬取。
-
如果 follow 为 True,那么 scrapy 会将提取的链接作为新的请求发送,并且使用相同的 callback 函数和 cb_kwargs 参数处理响应。
-
如果 follow 为 False,那么 scrapy 只会处理当前页面,并且不会跟随提取的链接。
-
如果 follow 为 None,那么 scrapy 会根据 callback 函数是否指定来决定是否跟随链接。如果 callback 为 None,那么 follow 为 True;如果 callback 不为 None,那么 follow 为 False。
-
follow 参数可以用来控制爬虫的深度和范围,例如,你可以设置只跟随第一层链接,或者只跟随特定域名或路径的链接等。
::: -
process_links:pass -
process_request:pass -
errback:pass
打包注意
出现多个执行窗口
使用 pyinstaller 进行项目打包时,特别是结合 pyqt 界面,软件启动后可能会出现多个窗口,这是因为 scrapy 框架本身有多进程、多线程机制,所以要在主程序入口处使用:
import multiprocessing

multiprocessing.freeze_support()
爬虫不能正常执行
如果是使用scrapy.cmdline.excute执行spider,则在主目录下要包含:
scrapy.cfg文件spider_project包文件
否则爬虫不能正确找到爬虫,而执行失败
其他
meta 方法在请求间传递数据
在 pipeline 管道中进行数据持久化等工作
在 downloader-middleware 下载器中间件中过滤数据
在请求中直接过滤数据
parse 到数据以后,直接 yield -o 导出到文件,不用写 item 即可获取原始数据
项目实现技巧汇总
scrapy parse 回调函数内手动触发重试机制
有时候处理 response 返回的html活json数据格式时,因为各种各样的原因会出现解析错误(但不会触发 scrapy 的重试机制),但是进行重试后,极大概率是正常的,可以手动捕获错误或者设置重试触发条件,yield 当前 scrapy.Request
:::warning
Scrapy 触发重试的条件有以下几种:
- 请求的响应状态码在
RETRY_HTTP_CODES设置中,这个设置是一个列表,用来指定哪些状态码需要重试,默认是[500, 502, 503, 504, 408] - 请求的响应出现异常,如连接超时、连接拒绝、代理错误等,这些异常会被
scrapy.downloadermiddlewares.retry.RetryMiddleware捕获并触发重试 - 请求的 meta 数据中有 “
dont_retry” 键,且值为False,这个键可以用来控制某个请求是否需要重试,如果值为True,则不会重试。
满足其一则会触发重试机制
:::
注意点:
- parse 方法需要设置
dont_filter=True yield的对象是response.request.copy()
实现案例:
B 站动态爬虫,手动触发重试机制:
捕获 json 解析的错误,然后重新 yield 请求到调度中心,进行重试
"""
B站动态爬虫
"""
import json
import pprint
import time
from typing import Iterable

import scrapy
from scrapy import Request
import requests


def get_cookie_b3():
    url = "https://api.bilibili.com/x/frontend/finger/spi"
    headers = {
        'user-agent': 'Mozilla/5.0 (Windows NT 10.0; Win64; x64) AppleWebKit/537.36 (KHTML, like Gecko) Chrome/120.0.0.0 Safari/537.36'
    }
    response = requests.request("GET", url, headers=headers)
    if response.status_code == 200:
        b3 = response.json()['data']['b_3']
        print(f'【接口获取】:b3={b3}')
        return b3


def active_b3(b3: str):

    url = "https://api.bilibili.com/x/internal/gaia-gateway/ExClimbWuzhi"
    time_stamp = str(int(time.time()*1000))
    p = '{"3064":1,"5062":"1704868900015","03bf":"https%3A%2F%2Fwww.bilibili.com%2F%3Fspm_id_from%3D333.1365.0.0","39c8":"333.1007.fp.risk","34f1":"","d402":"","654a":"","6e7c":"1285x1271","3c43":{"2673":0,"5766":24,"6527":0,"7003":1,"807e":1,"b8ce":"Mozilla/5.0 (Windows NT 10.0; Win64; x64) AppleWebKit/537.36 (KHTML, like Gecko) Chrome/120.0.0.0 Safari/537.36","641c":0,"07a4":"zh-CN","1c57":8,"0bd0":16,"748e":[2560,1440],"d61f":[2560,1392],"fc9d":-480,"6aa9":"Asia/Shanghai","75b8":1,"3b21":1,"8a1c":0,"d52f":"not available","adca":"Win32","80c9":[["PDF Viewer","Portable Document Format",[["application/pdf","pdf"],["text/pdf","pdf"]]],["Chrome PDF Viewer","Portable Document Format",[["application/pdf","pdf"],["text/pdf","pdf"]]],["Chromium PDF Viewer","Portable Document Format",[["application/pdf","pdf"],["text/pdf","pdf"]]],["Microsoft Edge PDF Viewer","Portable Document Format",[["application/pdf","pdf"],["text/pdf","pdf"]]],["WebKit built-in PDF","Portable Document Format",[["application/pdf","pdf"],["text/pdf","pdf"]]]],"13ab":"Ai4AAAAASUVORK5CYII=","bfe9":"BANgoArGysJlEUsK/A/wHYKgq1SuJ76QAAAABJRU5ErkJggg==","a3c1":["extensions:ANGLE_instanced_arrays;EXT_blend_minmax;EXT_color_buffer_half_float;EXT_disjoint_timer_query;EXT_float_blend;EXT_frag_depth;EXT_shader_texture_lod;EXT_texture_compression_bptc;EXT_texture_compression_rgtc;EXT_texture_filter_anisotropic;EXT_sRGB;KHR_parallel_shader_compile;OES_element_index_uint;OES_fbo_render_mipmap;OES_standard_derivatives;OES_texture_float;OES_texture_float_linear;OES_texture_half_float;OES_texture_half_float_linear;OES_vertex_array_object;WEBGL_color_buffer_float;WEBGL_compressed_texture_s3tc;WEBGL_compressed_texture_s3tc_srgb;WEBGL_debug_renderer_info;WEBGL_debug_shaders;WEBGL_depth_texture;WEBGL_draw_buffers;WEBGL_lose_context;WEBGL_multi_draw","webgl aliased line width range:[1, 1]","webgl aliased point size range:[1, 1024]","webgl alpha bits:8","webgl antialiasing:yes","webgl blue bits:8","webgl depth bits:24","webgl green bits:8","webgl max anisotropy:16","webgl max combined texture image units:32","webgl max cube map texture size:16384","webgl max fragment uniform vectors:1024","webgl max render buffer size:16384","webgl max texture image units:16","webgl max texture size:16384","webgl max varying vectors:30","webgl max vertex attribs:16","webgl max vertex texture image units:16","webgl max vertex uniform vectors:4096","webgl max viewport dims:[32767, 32767]","webgl red bits:8","webgl renderer:WebKit WebGL","webgl shading language version:WebGL GLSL ES 1.0 (OpenGL ES GLSL ES 1.0 Chromium)","webgl stencil bits:0","webgl vendor:WebKit","webgl version:WebGL 1.0 (OpenGL ES 2.0 Chromium)","webgl unmasked vendor:Google Inc. (AMD)","webgl unmasked renderer:ANGLE (AMD, AMD Radeon(TM) Graphics (0x00001638) Direct3D11 vs_5_0 ps_5_0, D3D11)","webgl vertex shader high float precision:23","webgl vertex shader high float precision rangeMin:127","webgl vertex shader high float precision rangeMax:127","webgl vertex shader medium float precision:23","webgl vertex shader medium float precision rangeMin:127","webgl vertex shader medium float precision rangeMax:127","webgl vertex shader low float precision:23","webgl vertex shader low float precision rangeMin:127","webgl vertex shader low float precision rangeMax:127","webgl fragment shader high float precision:23","webgl fragment shader high float precision rangeMin:127","webgl fragment shader high float precision rangeMax:127","webgl fragment shader medium float precision:23","webgl fragment shader medium float precision rangeMin:127","webgl fragment shader medium float precision rangeMax:127","webgl fragment shader low float precision:23","webgl fragment shader low float precision rangeMin:127","webgl fragment shader low float precision rangeMax:127","webgl vertex shader high int precision:0","webgl vertex shader high int precision rangeMin:31","webgl vertex shader high int precision rangeMax:30","webgl vertex shader medium int precision:0","webgl vertex shader medium int precision rangeMin:31","webgl vertex shader medium int precision rangeMax:30","webgl vertex shader low int precision:0","webgl vertex shader low int precision rangeMin:31","webgl vertex shader low int precision rangeMax:30","webgl fragment shader high int precision:0","webgl fragment shader high int precision rangeMin:31","webgl fragment shader high int precision rangeMax:30","webgl fragment shader medium int precision:0","webgl fragment shader medium int precision rangeMin:31","webgl fragment shader medium int precision rangeMax:30","webgl fragment shader low int precision:0","webgl fragment shader low int precision rangeMin:31","webgl fragment shader low int precision rangeMax:30"],"6bc5":"Google Inc. (AMD)~ANGLE (AMD, AMD Radeon(TM) Graphics (0x00001638) Direct3D11 vs_5_0 ps_5_0, D3D11)","ed31":0,"72bd":0,"097b":0,"52cd":[0,0,0],"a658":["Arial","Arial Black","Arial Narrow","Book Antiqua","Bookman Old Style","Calibri","Cambria","Cambria Math","Century","Century Gothic","Century Schoolbook","Comic Sans MS","Consolas","Courier","Courier New","Georgia","Helvetica","Impact","Lucida Bright","Lucida Calligraphy","Lucida Console","Lucida Fax","Lucida Handwriting","Lucida Sans","Lucida Sans Typewriter","Lucida Sans Unicode","Microsoft Sans Serif","Monotype Corsiva","MS Gothic","MS PGothic","MS Reference Sans Serif","MS Sans Serif","MS Serif","Palatino Linotype","Segoe Print","Segoe Script","Segoe UI","Segoe UI Light","Segoe UI Semibold","Segoe UI Symbol","Tahoma","Times","Times New Roman","Trebuchet MS","Verdana","Wingdings","Wingdings 2","Wingdings 3"],"d02f":"124.04347527516074"},"54ef":"{\\"b_ut\\":null,\\"home_version\\":\\"V8\\",\\"i-wanna-go-back\\":null,\\"in_new_ab\\":true,\\"ab_version\\":{\\"for_ai_home_version\\":\\"V8\\",\\"tianma_banner_inline\\":\\"CONTROL\\",\\"login_dialog_version\\":\\"V_BACK_BLOCK\\",\\"h5_read_awaken_app\\":\\"B\\",\\"home_pop_window\\":\\"V1\\",\\"channel_show_back_btn\\":\\"HIDDEN\\",\\"nano_pcdn_version\\":\\"V_PCDN\\",\\"in_theme_version\\":\\"CLOSE\\",\\"storage_back_btn\\":\\"HIDE\\",\\"web_homepage_video_continuation\\":\\"OPEN\\",\\"clean_version_old\\":\\"GO_NEW\\",\\"top_switch\\":\\"SHOW\\",\\"exit_feed_btn\\":\\"HIDE\\",\\"force_to_feed\\":\\"GO\\",\\"bmg_fallback_version\\":\\"FALLBACK\\",\\"enable_web_push\\":\\"DISABLE\\",\\"desktop_download_tip\\":\\"SHOW\\"},\\"ab_split_num\\":{\\"for_ai_home_version\\":7,\\"tianma_banner_inline\\":7,\\"login_dialog_version\\":43,\\"h5_read_awaken_app\\":2,\\"home_pop_window\\":2,\\"channel_show_back_btn\\":24,\\"nano_pcdn_version\\":90,\\"in_theme_version\\":29,\\"storage_back_btn\\":14,\\"web_homepage_video_continuation\\":53,\\"clean_version_old\\":50,\\"top_switch\\":1,\\"exit_feed_btn\\":61,\\"force_to_feed\\":10,\\"bmg_fallback_version\\":96,\\"enable_web_push\\":18,\\"desktop_download_tip\\":92}}","8b94":"https%3A%2F%2Ft.bilibili.com%2F","07a4":"zh-CN","5f45":null,"db46":0}'
    p = p.replace("1704868900015", time_stamp)
    payload = {
        'payload': p}
    headers = {
        'authority': 'api.bilibili.com',
        'accept': '*/*',
        'accept-language': 'zh-CN,zh;q=0.9',
        'content-type': 'application/json;charset=UTF-8',
        'cookie': f'buvid3={b3}',
        'origin': 'https://www.bilibili.com',
        'referer': 'https://www.bilibili.com/?spm_id_from=333.1365.0.0',
        'user-agent': 'Mozilla/5.0 (Windows NT 10.0; Win64; x64) AppleWebKit/537.36 (KHTML, like Gecko) Chrome/120.0.0.0 Safari/537.36'
    }
    print(payload)
    response = requests.request("POST", url, headers=headers, json=payload)
    if response.status_code == 200:
        res = response.json()
        print(res)
        if res["code"] == 0:
            print(f'已激活,bvuid3\n{b3}')
            return b3


def get_b3():
    _b3 = get_cookie_b3()
    b3 = active_b3(_b3)
    if b3:
        return b3
    else:
        print('获取或激活 b3 失败')


class BilibiliSpider(scrapy.Spider):
    name = "bilibili"
    allowed_domains = ["space.bilibili.com"]
    custom_settings = {
        "FEED_EXPORT_ENCODING": "utf-8-sig"
    }
    headers = {
        'authority': 'api.live.bilibili.com',
        'accept': '*/*',
        'accept-language': 'zh-CN,zh;q=0.9,en;q=0.8',
        'referer': 'https://www.bilibili.com/',
        # 'sec-ch-ua': '"Not_A Brand";v="8", "Chromium";v="120", "Google Chrome";v="120"',
        # 'sec-ch-ua-platform': '"Windows"',
        'user-agent': 'Mozilla/5.0 (Windows NT 10.0; Win64; x64) AppleWebKit/537.36 (KHTML, like Gecko) Chrome/120.0.0.0 Safari/537.36'
    }
    # start_urls = ["https://space.bilibili.com/665457/dynamic"]

    def __init__(self, *args, **kwargs):
        super().__init__(*args, **kwargs)
        # 取值更好的一种方式是,使用 get 方法,这样可以同时设置默认值,更通用
        # self.arg = kwargs.get('agr', 'default_v')
        self.user_id = kwargs.get('user_id')
        self.cookies = {'buvid3': get_b3()}

    def start_requests(self) -> Iterable[Request]:
        yield scrapy.Request(
            url=f"https://api.bilibili.com/x/polymer/web-dynamic/v1/feed/space?offset=&host_mid={self.user_id}&time"
                             "zone_offset=-480&platform=web&features=itemOpusStyle,listOnlyfans,opusBigCover,onlyfansVo"
                             "te&web_location=333.999",
            headers=self.headers,
            cookies=self.cookies,
            callback=self.parse,
            errback=self.handle_error,
            dont_filter=True,
        )

    def parse(self, response):
        try:
            data = response.json()['data']['items']
            for d in data:
                # 提取基础信息
                base_info = {
                    'user_name': d['modules']['module_author']['name'],
                    'pub_time': d['modules']['module_author']['pub_time'],
                    'content': d['modules']['module_dynamic']['desc']['text'] if d['modules']['module_dynamic']['desc'] else 'null',
                    'comment_count': d['modules']['module_stat']['comment']['count'],
                    'like_count': d['modules']['module_stat']['like']['count'],
                    'forward_count': d['modules']['module_stat']['forward']['count'],
                    'dynamic_type': d['type'].split('_')[-1],
                }
                # 预设视频信息,默认为空
                video_info = {
                    "video_url": '-',
                    "video_title": '-',
                    "cover": '-',
                    "desc": '-',
                    "danmu_count": '-',
                    "play_count": '-',
                }
                # 判断是否存在视频信息,如果是,更新视频信息
                has_video = d['modules']['module_dynamic']['major']
                if has_video:
                    if has_video.get('archive'):
                        video_info = {
                            "video_url": d['modules']['module_dynamic']['major']['archive']['jump_url'],
                            "video_title": d['modules']['module_dynamic']['major']['archive']['title'],
                            "cover": d['modules']['module_dynamic']['major']['archive']['cover'],
                            "desc": d['modules']['module_dynamic']['major']['archive']['desc'],
                            "danmu_count": d['modules']['module_dynamic']['major']['archive']['stat']['danmaku'],
                            "play_count": d['modules']['module_dynamic']['major']['archive']['stat']['play'],
                        }
                # 合并基础信息和视频信息
                res = {**base_info, **video_info}
                yield res
            # 如果存在下一页,就爬取下一页
            offset = response.json()['data']['offset']
            if offset:
                # time.sleep(0.2)
                yield scrapy.Request(
                    url=f"https://api.bilibili.com/x/polymer/web-dynamic/v1/feed/space?offset={offset}&host_mid={self.user_id}&time"
                                 "zone_offset=-480&platform=web&features=itemOpusStyle,listOnlyfans,opusBigCover,onlyfansVo"
                                 "te&web_location=333.999",
                    callback=self.parse,
                    dont_filter=True,
                    headers=self.headers,
                    cookies=self.cookies,
                )
        except:
            yield response.request.copy()

    def handle_error(self, failure):
        # 处理请求失败
        # 重新将请求丢回调度系统内,重新请求
        request = failure.request
        self.logger.error('Request failed: %s', request.url)
        yield request.copy()


# 启动指令, 其中
# scrapy crawl bilibili -o bilibili-25876945.csv -a user_id=25876945
scrapy parse 指定 errback,指定请求错误处理
errback往往设置为一个函数/方法,用来处理请求错误(错误的响应码,代理错误,连接超时等)发生后,如何进行处理;
常用来进行,打印错误日志/重试
实现案例:
请求错误后,获取错误信息,进行错误判定,打印指定的错误日志
import scrapy
from scrapy.spidermiddlewares.httperror import HttpError
from twisted.internet.error import DNSLookupError
from twisted.internet.error import TimeoutError, TCPTimedOutError

class ErrbackSpider(scrapy.Spider):
    name = "errback_example"
    start_urls = [
        "http://www.httpbin.org/", # HTTP 200 expected
        "http://www.httpbin.org/status/404", # Not found error
        "http://www.httpbin.org/status/500", # server issue
        "http://www.httpbin.org:12345/", # non-responding host, timeout expected
        "http://www.httphttpbinbin.org/", # DNS error expected
    ]

    def start_requests(self):
        for u in self.start_urls:
            yield scrapy.Request(u, callback=self.parse_httpbin, errback=self.errback_httpbin, dont_filter=True)

    def parse_httpbin(self, response):
        self.logger.info('Got successful response from {}'.format(response.url))
        # do something useful here...

    def errback_httpbin(self, failure):
        # log all failures
        self.logger.error(repr(failure))
        # in case you want to do something special for some errors,
        # you may need the failure's type:
        if failure.check(HttpError):
            # these exceptions come from HttpError spider middleware
            # you can get the non-200 response
            response = failure.value.response
            self.logger.error('HttpError on %s', response.url)
        elif failure.check(DNSLookupError):
            # this is the original request
            request = failure.request
            self.logger.error('DNSLookupError on %s', request.url)
        elif failure.check(TimeoutError, TCPTimedOutError):
            request = failure.request
            self.logger.error('TimeoutError on %s', request.url)
UA 默认设置为随机的 UA 头,在处理某些网站是有奇效
Xpath 和 CSS 选择器 搭配使用,再获取某些元素时,更为方便
